Setup simple greeting
This guide will show you how to set up a simple call flow in Dialogue Studio that will route incoming calls to an audio file and then assign the customer to a specific queue.

Tip
If you prefer not to follow the step-by-step guide, you can still get started quickly by downloading the Flow example at the end of this article. This will give you a clear idea of how the process works, and you can use it as a starting point to customize your own flow.
Step 1: Start with an Incoming Node
First, drag and drop an Incoming node into your flow area and double-click to configure it. In the Address dropdown, select the address you want to connect to Dialogue Studio and click Done.
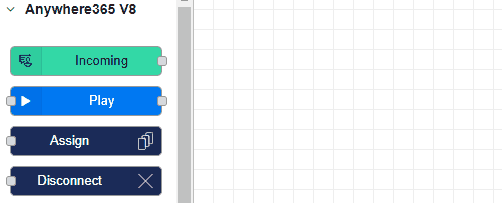
Step 2: Configure a Play Node
Drag and drop a Play node into your flow area and double-click to configure it. In the File field, enter a URL of a WAV file that is publicly available and meets the following specifications:
-
Frequency: 16000Hz
-
Sample size: 16-bits
-
Number of channels: 1
Now, link the Play node to the Incoming node by clicking and holding on the gray box on the right of the Incoming node and releasing it on the gray box on the left of the Play node.

Optionally, you can repeat this step if you want to play multiple audio files. In the example at the end of this user guide, we will have two Play nodes that will play:
-
"Welcome to Infinity"
-
"We will now connect you to an agent".
Step 3: End with an Enqueue Node
Now that we have the greeting in place, we want to put the customer in the queue. This can be done by dragging and dropping an Enqueue node in the flow area and double-clicking to configure it. In the Queue dropdown, you can select the contact center you want to assign.
Link the Play node to the Enqueue node by clicking and holding on the gray box right of the Play node and releasing it on the gray box left of the Enqueue node.
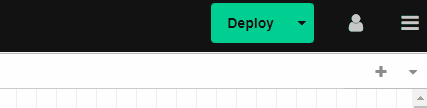
Step 4: Deploy and Test
With your call flow configured, you can deploy it. This can be done by clicking on the Deploy button in the top right corner. After clicking this, the call flow is live and you can now call the address you assigned to test.
Congratulations! You have now set up a simple call flow in Dialogue Studio that will route incoming calls to an audio file and then assign the customer to a specific queue.
Troubleshooting
It could happen that a mistake occurs, in the Debug tab, you can see what is going wrong. Here are some common mistakes and solutions:
"Action failed, file format is invalid."
The file URL you used isn't in the right format, please make sure it is a WAV with the following format:
- Frequency: 16000Hz
- Sample size: 16-bits
- Number of channels: 1
"Action failed, file could not be downloaded."
The file URL you used cannot be accessed by Dialogue Studio, please make sure the file is publicly available.
Flow example
To use the JSON file to compare your callflow or use it as a baseline, follow these steps:
-
Click on the menu button in the top right corner or use the Ctr+I shortcut to open the Import window.
-
Paste the content of the JSON into the field.
-
(Optional) Click "New Flow" if you want to import the Callflow into a different tab.
-
Click "Import".
Once imported, configure the Incoming and Enqueue nodes with the address and queue you want to use.
[{"id":"5e4930837fd3b7a7","type":"tab","label":"Learn - Simple Greeting example","disabled":false,"info":"","env":[]},{"id":"dd8a284de1bc7ea3","type":"anywhere365-incoming","z":"5e4930837fd3b7a7","name":"","address":"1265e7fd-6a2b-4c67-9e10-f76eac009fb7","x":440,"y":240,"wires":[["c2274c05a82c0efd"]]},{"id":"c2274c05a82c0efd","type":"anywhere365-play","z":"5e4930837fd3b7a7","name":"Welcome to Infinity","dialogueId":"dialogue.id","dialogueIdType":"msg","audioSource":"audio-source-url","valueUrl":"https://dialoguestudio.anywhere365.io/media/learn-examples/welcome-to-infinity.wav","valueUrlType":"str","repeat":"0","repeatType":"num","x":630,"y":240,"wires":[["163618992ca8850e"]]},{"id":"163618992ca8850e","type":"anywhere365-play","z":"5e4930837fd3b7a7","name":"We will now connect you to an agent","dialogueId":"dialogue.id","dialogueIdType":"msg","audioSource":"audio-source-url","valueUrl":"https://dialoguestudio.anywhere365.io/media/learn-examples/we-will-now-connect-you-to-an-agent.wav","valueUrlType":"str","repeat":"0","repeatType":"num","x":910,"y":240,"wires":[["b720c67f80b6c70a"]]},{"id":"b720c67f80b6c70a","type":"anywhere365-enqueue","z":"5e4930837fd3b7a7","name":"","contactCenterSelectedOption":"contact-center-select","contactCenterSelect":"","contactCenterVariableType":"msg","requiredSkillSelectedOption":"required-skill-select","requiredSkillSelect":"","requiredSkillVariableType":"msg","dialogueId":"dialogue.id","dialogueIdType":"msg","x":1160,"y":240,"wires":[]}]