Recurring Operation: Create Address
An address is an entity in AnywhereNow that can be used to receive communications. To receive audio calls via Microsoft Teams, such an address should be created. This address can be used to initiate a phone call via Microsoft Teams. Optionally, if a phone number is assigned, this address can also be called from other, non-Microsoft Teams, devices.
In your Microsoft tenant, these addresses are called ‘Resource Accounts’.
Please follow below steps to create a Resource Account in your Microsoft Tenant, assign a license (and optionally a phone number) to this resource account, point the resource account to AnywhereNow, and finally configure an address in your AnywhereNow Tenant.
Create a Resource Account
-
Open Windows PowerShell or PowerShell (no Elevated Permissions are needed)
- Make sure to use 64-bit version of PowerShell
-
Run the following PowerShell command to login to Microsoft Teams
-
Login with a Microsoft User Account that has either one of these permissions
- Global Administrator;
- Teams Administrator; or
- Teams Communications Administrator
To learn how to assign user roles with Azure Active Directory please visit:
Associate or add an Azure subscription to your Microsoft Entra tenant | Microsoft Learn -
Run the following PowerShell command to create the resource account and point it to the back-end App Registration
Please Note
Replace username@domain.com and DisplayName with the UPN and displayname you provided when creating the resource account.
Note
Please select your matching regional PowerShell command.
CopyPowerShell for Production NORANew-CsOnlineApplicationInstance -UserPrincipalName 'user@domain.com' -ApplicationId 'ddecbc1f-b83e-4725-8535-a0d2fe3e5369' -DisplayName "DisplayName"CopyPowerShell for Production EMEANew-CsOnlineApplicationInstance -UserPrincipalName 'user@domain.com' -ApplicationId '71240355-f973-44f0-af0c-f1fdd0275214' -DisplayName "DisplayName"CopyPowerShell for PreviewNew-CsOnlineApplicationInstance -UserPrincipalName 'user@domain.com' -ApplicationId 'fc323a43-fda2-4a68-9ee4-75961abd77a9' -DisplayName "DisplayName" -
Run the following PowerShell command to verify if the address is created and the Application Id is correct.
Please note
Replace username@domain.com with the actual username and domain you provided when creating the resource account.
-
Run to following PowerShell command to ensure the application instance is synced
Please note:
Replace username@domain.com with the actual username and domain you provided when creating the resource account.
Note
Please select your matching regional PowerShell command.
CopyProduction NORA PowerShell$objectId = (Get-CsOnlineApplicationInstance -Identity 'user@domain.com').ObjectId
Sync-CsOnlineApplicationInstance -ObjectId $objectId -ApplicationId 'ddecbc1f-b83e-4725-8535-a0d2fe3e5369'CopyProduction EMEA PowerShell$objectId = (Get-CsOnlineApplicationInstance -Identity 'user@domain.com').ObjectId
Sync-CsOnlineApplicationInstance -ObjectId $objectId -ApplicationId '71240355-f973-44f0-af0c-f1fdd0275214'CopyPreview PowerShell$objectId = (Get-CsOnlineApplicationInstance -Identity 'user@domain.com').ObjectId
Sync-CsOnlineApplicationInstance -ObjectId $objectId -ApplicationId 'fc323a43-fda2-4a68-9ee4-75961abd77a9'

Assign a license to your Resource Account
-
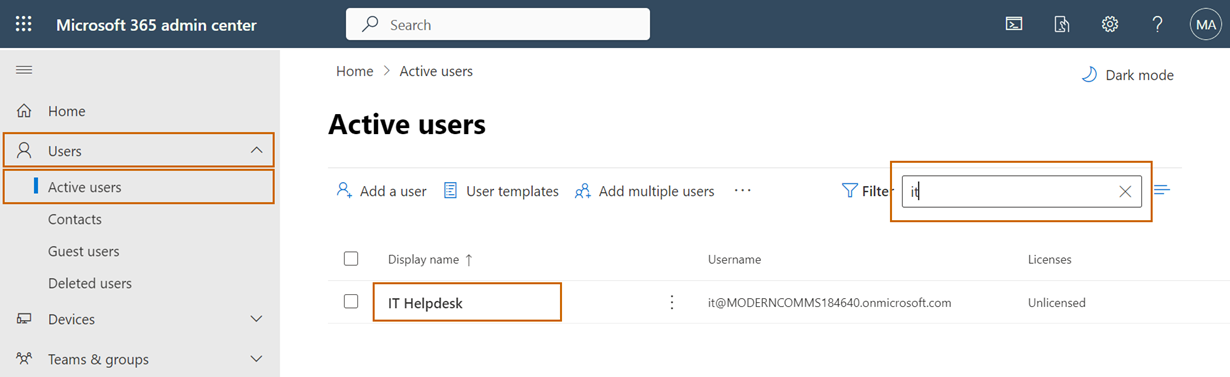
Navigate to your Microsoft 365 admin center
-
Click users
-
Click active users
-
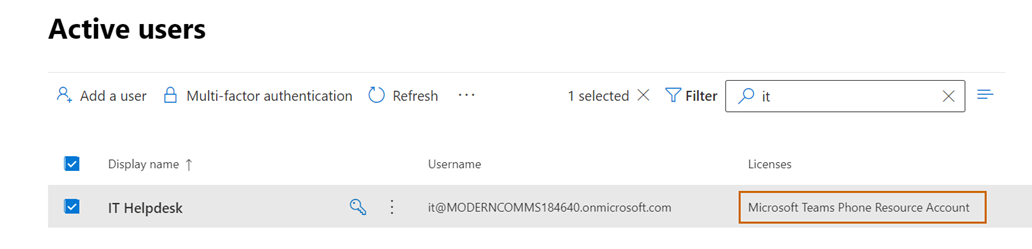
Search in the active users list for the newly created resource account
-
Open the user (by clicking the corresponding Display name)
-
Click license and apps
-
Assign a Microsoft Teams Phone Resource Account license (by checking the box in front of this license)
Tip
If you plan to use outbound calling to PSTN along with Calling Plans, you can now choose the appropriate Calling Plan license here.
-
Click save changes
-
Close the user detail page
-
Open Windows PowerShell or PowerShell (no Elevated Permissions are needed)
- Make sure to use 64-bit version of PowerShell
-
Run the following PowerShell command to login to Microsoft Teams
-
Login with a Microsoft User Account that has either one of these permissions
- Global Administrator;
- Teams Administrator; or
- Teams Communications Administrator
To learn how to assign user roles with Azure Active Directory please visit:
Add an existing Azure subscription to your tenant | Microsoft Learn -
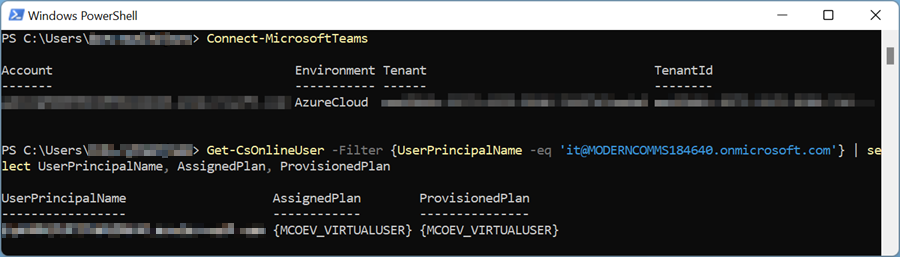
Run the following PowerShell command to verify if the license is provisioned
Please note:
Replace username@domain.com with the actual username and domain you provided when creating the resource account.
CopyPowerShellGet-CsOnlineUser -Filter {UserPrincipalName -eq 'username@domain.com'} | select UserPrincipalName, AssignedPlan, ProvisionedPlan Expected outcome: Both the AssignedPlan as well as the ProvisionedPlan should indicate MCOEV_VIRTUALUSER (or MicrosoftCommunicationsOnline)
If this is not the case, wait a minute and repeat this step before continuing.


Optionally, assign a phone number
Warning
Even if you don't assign a phone number, you still need to complete the next steps. Continue here Create an Address in AnywhereNow
If you have an Session Border Controller connected to Microsoft Teams (either via Direct Routing or Operator connect) or you have acquired phone numbers from Microsoft directly, you can assign a phone number to this resource account.
This is only required if people should be able to call your Contact Center from any device using PSTN, or when Agents should be able to make outbound calls to PSTN on behalf of your Contact Center.
Tip
For more information see the Microsoft documentation on Set-CsPhoneNumberAssignment (MicrosoftTeamsPowerShell) | Microsoft Learn.
-
Open Windows PowerShell or PowerShell (no Elevated Permissions are needed)
- Make sure to use 64-bit version of PowerShell
-
Run the following PowerShell command to login to Microsoft Teams
-
Login with a Microsoft User Account that has either one of these permissions
- Global Administrator;
- Teams Administrator; or
- Teams Communications Administrator
To learn how to assign user roles with Azure Active Directory please visit:
Add an existing Azure subscription to your tenant | Microsoft Learn -
Run the following PowerShell command to assign a phone number to the resource account
- Provide the correct identity (username@domain.com)
- Provide the correct phone number
- Provide the correct phone number type
- CallingPlan
- DirectRouting
- OperatorConnect
CopyPowerShell CallingPlanSet-CsPhoneNumberAssignment -Identity user@domain.com -PhoneNumber +1000000000 -PhoneNumberType CallingPlanCopyPowerShell DirectRoutingSet-CsPhoneNumberAssignment -Identity user@domain.com -PhoneNumber +1000000000 -PhoneNumberType DirectRoutingCopyPowerShell OperatorConnectSet-CsPhoneNumberAssignment -Identity user@domain.com -PhoneNumber +1000000000 -PhoneNumberType OperatorConnect -
Run the following PowerShell command to verify if the Phone Number is assigned successfully.
Please note
Replace username@domain.com with the actual username and domain you provided when creating the resource account.
CopyPowerShellGet-CsOnlineApplicationInstance -Identity 'user@domain.com' | SELECT UserPrincipalName, PhoneNumber


Optionally, enable for outbound calling
Warning
Even if you don't enable for outbound calling, you still need to complete the next steps. Continue here Create an Address in AnywhereNow
While internal calls (i.e., calling colleagues within the same tenant) require no adjustments to the resource account, PSTN calls may necessitate additional licenses or configuration.
Using Microsoft Calling Plans
The resource account requires an additional Calling Plan license, this can be assigned in the same way as Assign a license to your Resource Account
For more information about the available licenses, see: Microsoft Calling Plans for Teams - Microsoft Teams
Using Microsoft Direct Routing or Operator Connect
To use outbound calling with Microsoft Direct Routing or Operator Connect, ensure that proper routing to the PSTN is configured. Typically, the existing Microsoft Teams Phone Resource Account license will suffice.
However, if your organization has restricted the Global Voice Routing Policy or if the resource account requires a specific Voice Routing Policy, these configurations must be made using PowerShell. For detailed instructions, see Annex 5: Assign Online Voice Routing Policy using PowerShell
Create an Address in AnywhereNow
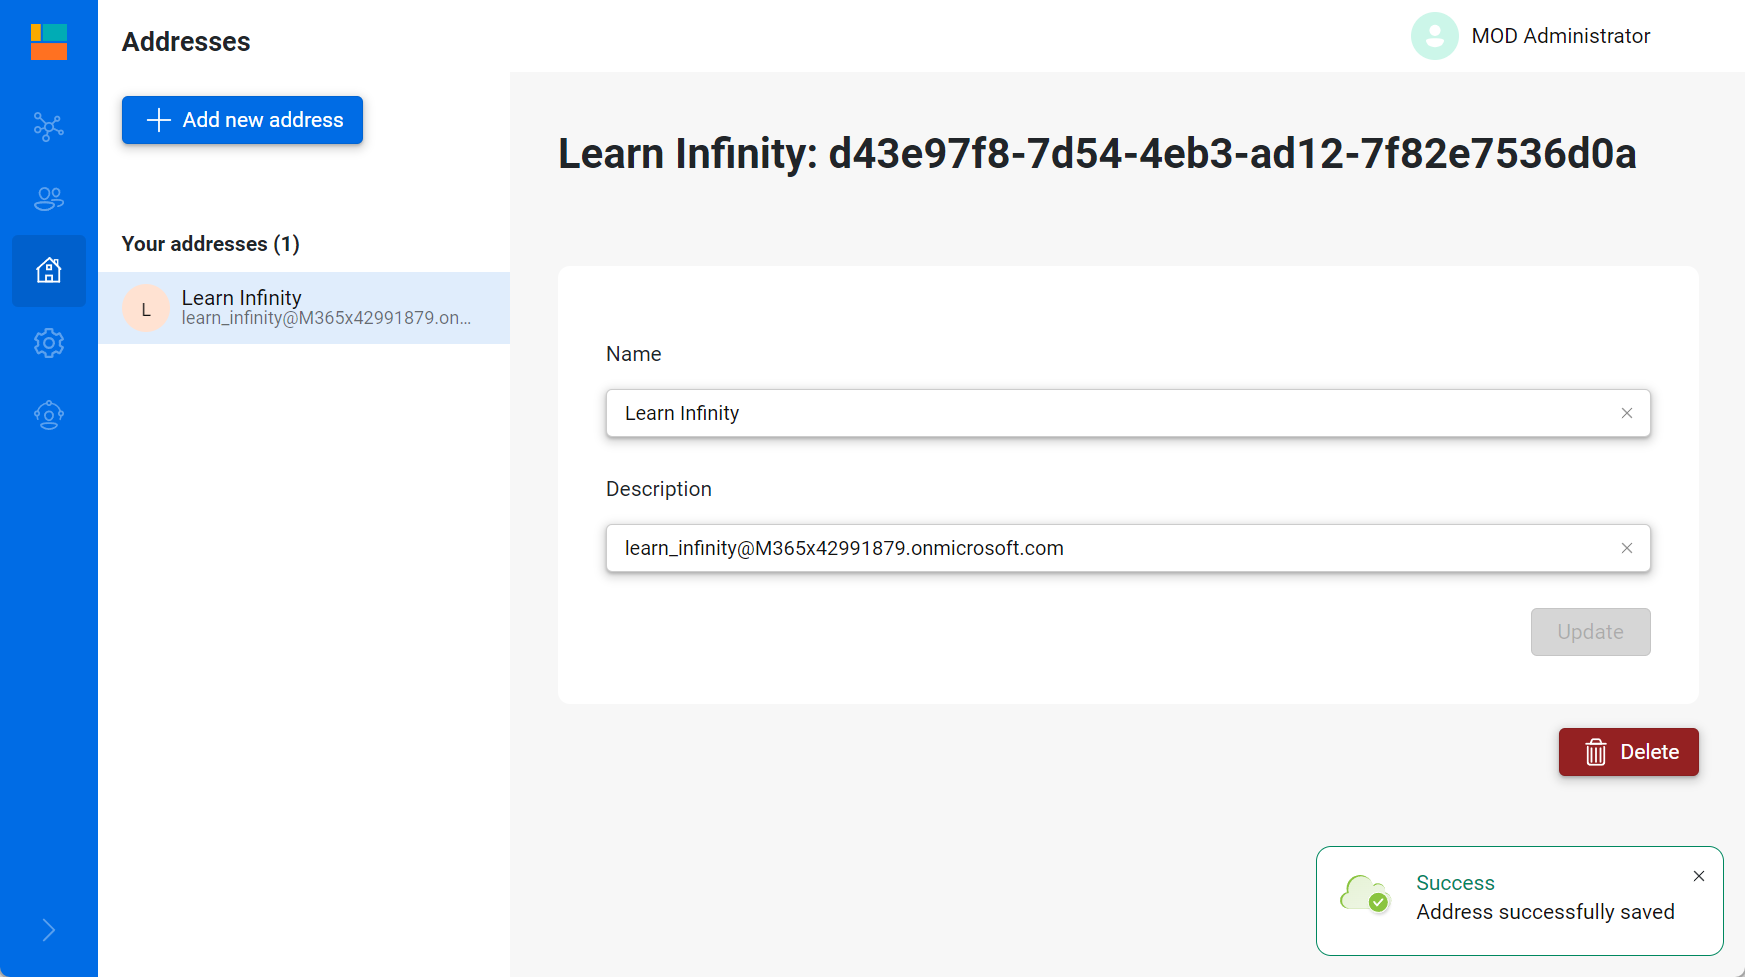
The resource account has been created. However, if you would call it now from your Microsoft Teams client, the call would reach AnywhereNow, but since AnywhereNow is unaware how to handle this incoming call it will decline the call. In order for AnywhereNow to handle the call properly, both an Address as well as a Contact Center with the Address assigned should be configured. Let’s configure an Address first.
-
Navigate to your:
Note
Please select your matching regional admin portal.
AnywhereNow admin Portal (Production NORA)
-
Click addresses
-
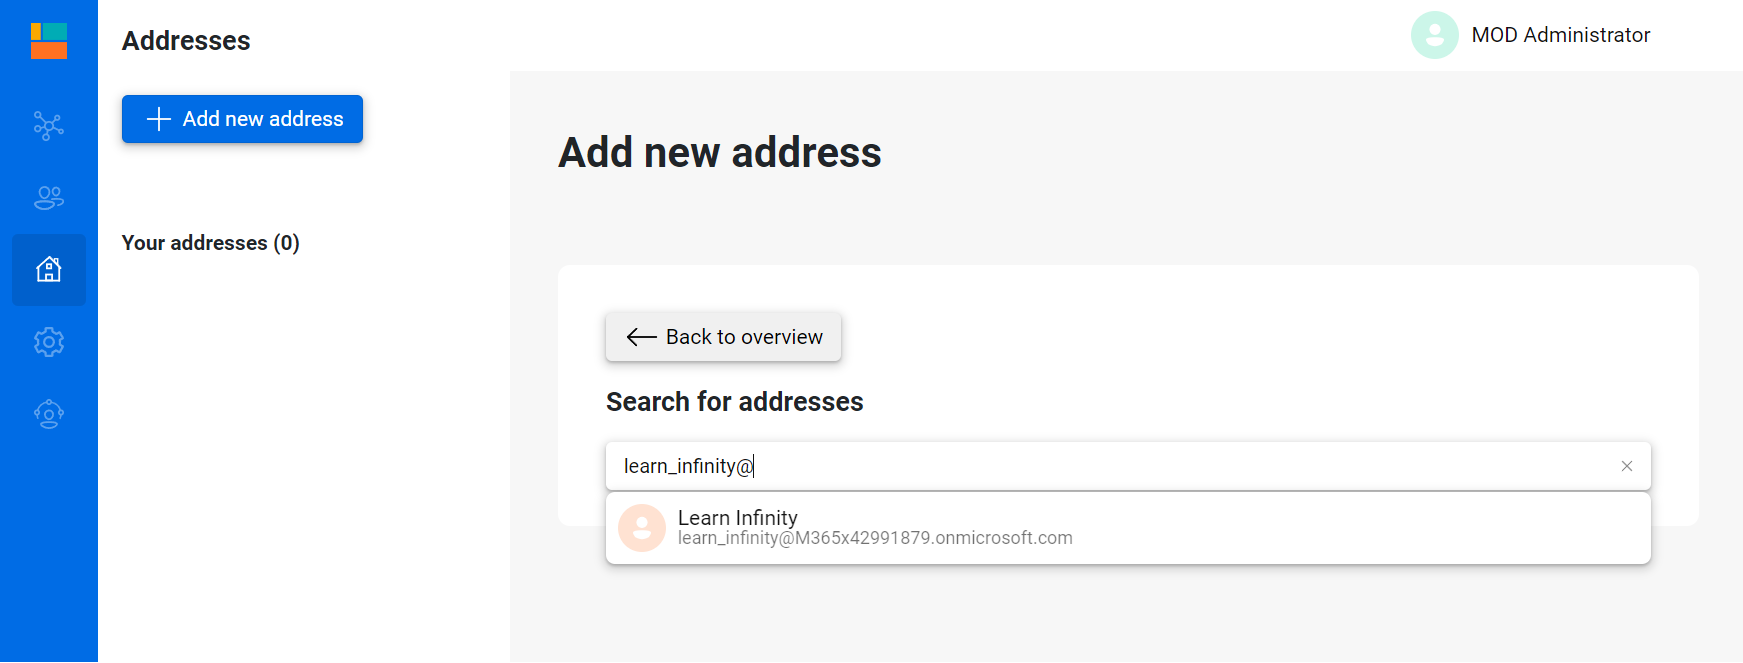
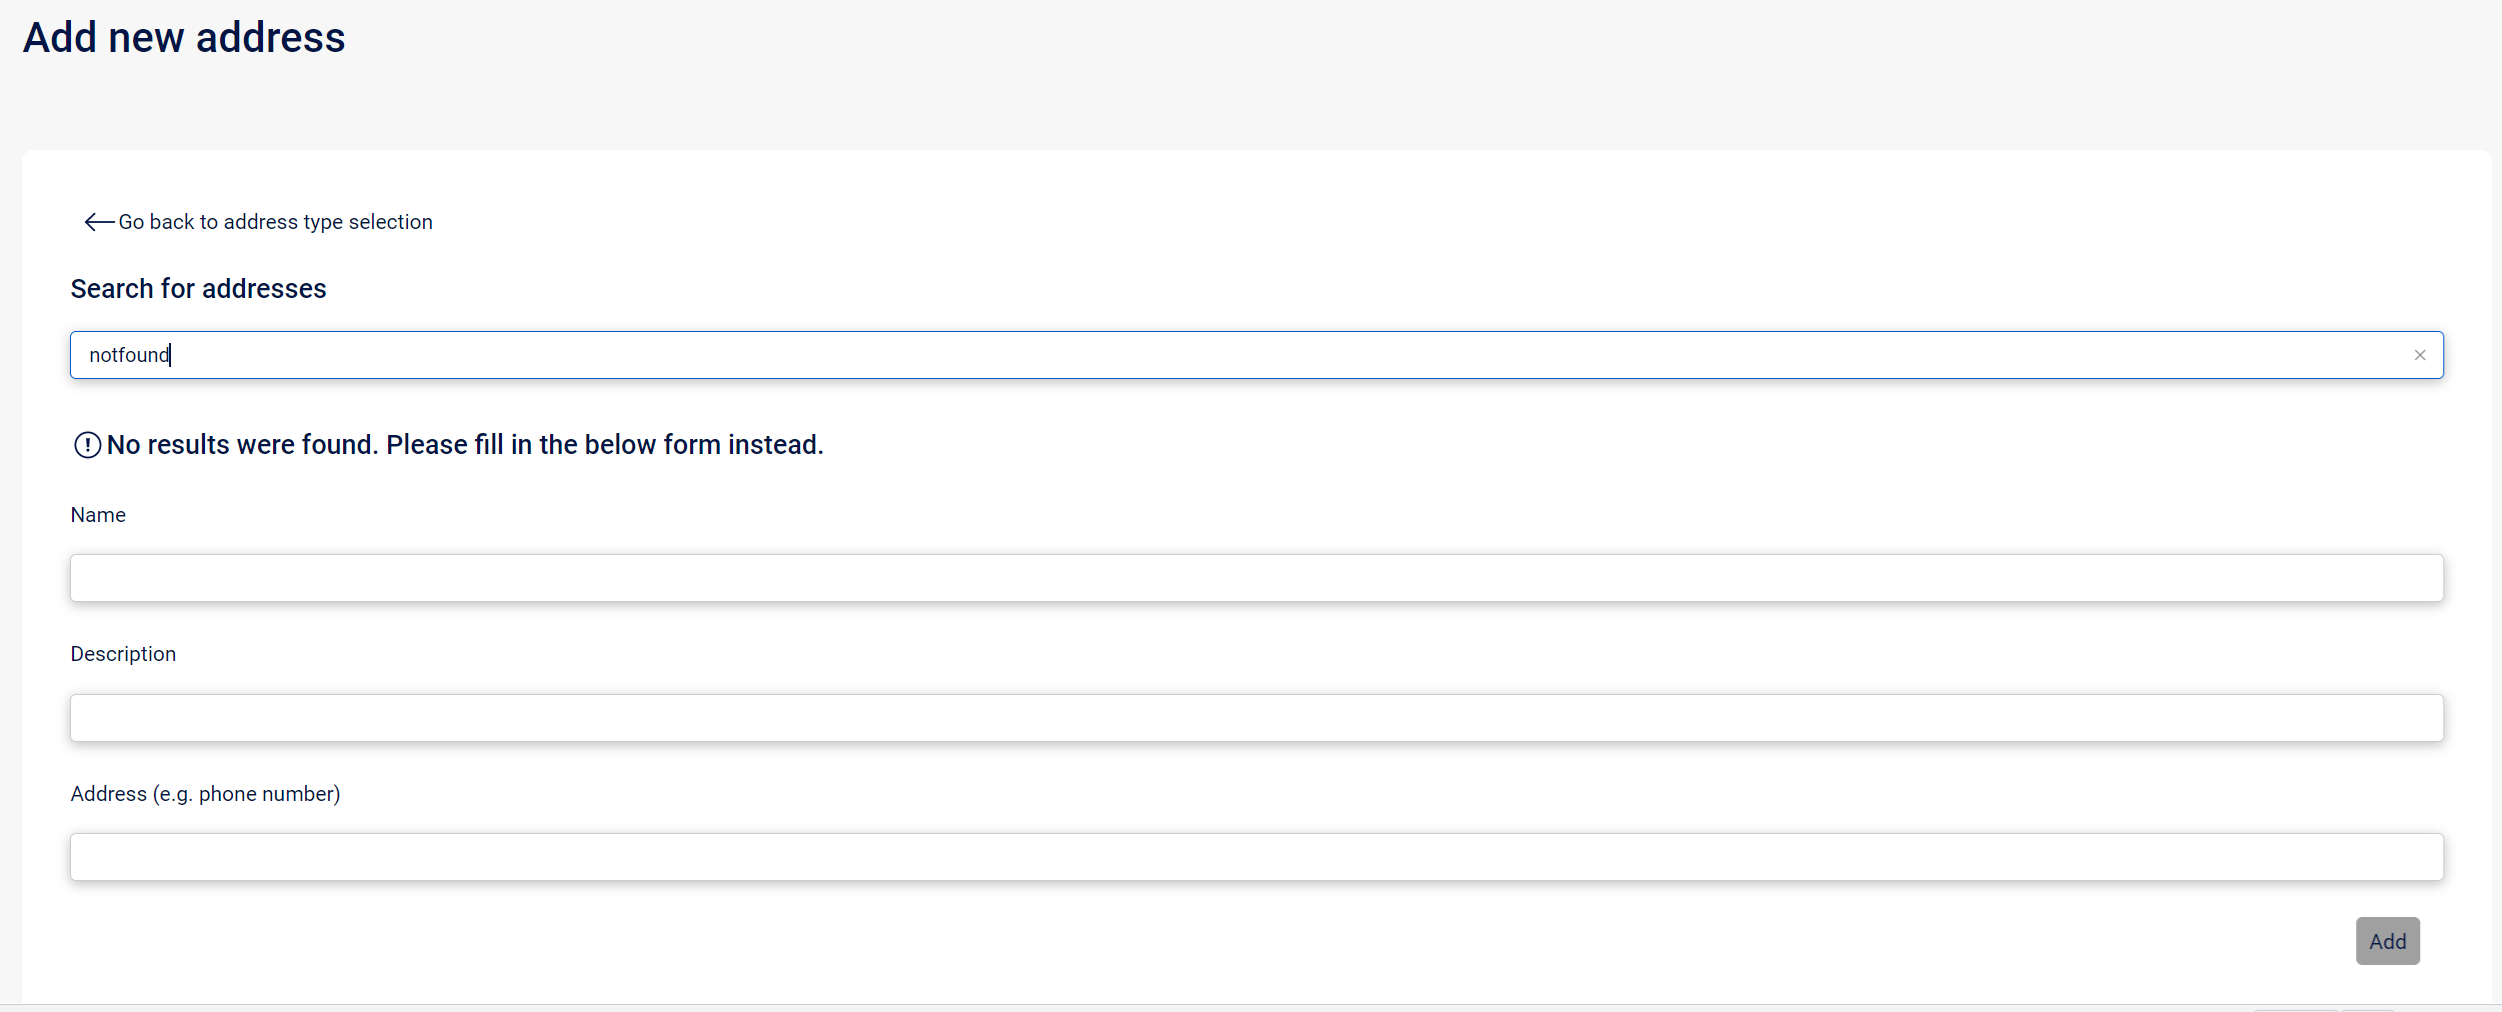
Click add new address
-
Search for the resource account that you created earlier
Unexpected outcome: The resource account does not show-up
Please note
It can take up to 12 hours before the resource account can be found. Because the cache used by Omnidir is updated every 12 hours, this will be lowered prior to go live, also there will be a possibility to manually add an address if it cannot be found via the search.
In this case it is possible to manually add the address
-
Fill in a display name
-
Fill in a description (we suggest to use the user principal name and/or the assigned phone number)
-
Fill in the address, this is the object id of the resource account. This can be found in the Microsoft 365 admin center:
- Navigate to users > active users > lookup the resource account > select it
- The object id appears in the address bar
https://admin.microsoft.com/Adminportal/Home?#/users/:/UserDetails/00000000-0000-0000-0000-000000000000
-
-
Hover over the result
-
Click add